Construction Cake
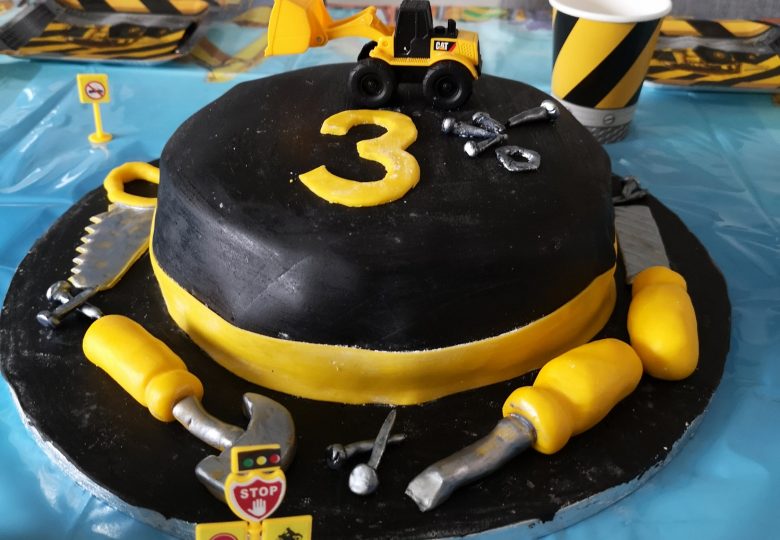
Since lots of you loved the cake for Jamie´s Birthday party, I am going to share the recipé with you. All the decorations are from Party in a Box
The cake was lactose free and baked it with spelt flour. If you don’t have IBS, you can easily switch it out with regular milk products and wheat.

For the cake base you need:
- 1 Polynesian Vanilla Pod
- 100 g White Sugar
- 8 Eggs
- 130 g spelt flour
- 1 teaspoon Baking Soda
Turn on the oven on 180 degrees Celcius hot air. Cut the vanilla pod along the long edge and scrape out the vanilla seeds. Squash them with a small part of the sugar.
Divide the eggs into egg white and egg yolk. Stir the egg yolk, the sugar and vanilla sugar long enough for it to turn white and airy. Mix the flour with the baking soda and add it slowly to the eggmass, while stirring.
Stir the egg white until its stiff. Use clean utencils. Then add the eggwhites with a spoon in to the rest of the dough. Stir as little as possible.
Use a 23 cm round springform. Sheet it with baking paper. Add the dough and even it out. Bake the cake for approximately 30 minutes. Let it cool off before taking it out of the springform and cutting it into 3 even slices.
The Custard – (1 layer)
- 1 Polynesian Vanilla Pod
- 100 g Sugar
- 4 eggyolks
- 40 g Maizena Corn Starch
- 4 dl Lactosefree Whole Milk
Open the vanilla pod on the long edge and scrape carefully all the seeds out. Squash the seeds with some of the sugar. Mix the vanilla sugar, sugar and the eggyolk in a bowl. Stir it so it becomes fluffy before it turns white. Stir Maizena into 1 dl of the milk and add it the egg mixture. Stir it well until it is an even sticky mass.
Warm up the rest of the milk along with the empty vanilla pod, just right before it reaches boiling point. Add the egg mixture while stirring fast. Then turn the heat down to medium. Keep stirring well until the creme thickens and boils. Continue stirring the creme for 1 minute after you can see the boiling bobles in the thick creme. Then pour the cream into a clean bowl. Remove the vanilla pod and cover the creme with clingfilm. The film needs to be pressed down on the suface of the creme, to prevent condensation. It takes approximately 2 hours to cool down in your frigde.
The Custard – (2nd layer)
- 400 g of frozen berries
- 2 Polynesian Vanilla Pod
- 3 pieces of gelatin
- 100 g Sugar
- 1 tsp Lemon juice
- 4 eggyolks
- 40 g Maizena Corn Starch
- 4 dl Lactosefree Whole Milk
Soak the gelatine in lots of cold water, for 15 minutes. Open 1 vanilla pod on the long edge and scrape carefully all the seeds out. Cook the frozen berries, sugar, lemon juice, vanilla seeds & the rest of the pod ina pot. Let it cook at medium heat for 5 minutes. Take it off the stove. Take the gelatine and let the access water drip off, before adding it to the warm berries. Stir it well together and let it cool off on your counter for 10-15 minutes.
Open the 2nd vanilla pod on the long edge and scrape carefully all the seeds out. Squash the seeds with some of the sugar. Mix the vanilla sugar, sugar and the eggyolk in a bowl. Stir it so it becomes fluffy before it turns white. Stir Maizena into 1 dl of the milk and add it the egg mixture. Stir it well until it is an even sticky mass.
Warm up the rest of the milk along with the empty vanilla pod, just right before it reaches boiling point. Add the egg mixture while stirring fast. Then turn the heat down to medium. Keep stirring well until the creme thickens and boils. Continue stirring the creme for 1 minute after you can see the boiling bobles in the thick creme. Then pour the cream along with the fruit mass into a clean bowl. Remove the vanilla pod and cover the creme with clingfilm. The film needs to be pressed down on the suface of the creme, to prevent condensation. It takes approximately 2 hours to cool down in your frigde.

Make the tools
- 400 grams yellow fondant
- 400 grams black fondant.
- Edible silver paint
I borrowed some of my sons play tools, to have something to look at. You could also try and order some tool molds on wish or ebay. But I was short on time 😀
Warm up the fondant by working with it. Once it is warm, you can easily roll it into shapes. I bought some fondant tools to make it easier to create marks on the tools. Once you have formed them and they are ready to paint, let them cool off over night in your refrigderater. The next day you can paint them with edible silver paint. Once you have assembled the cake you can place them on top….

Assemble the cake
- 200 grams dark chocolate
- cake base
- custard
- fondant
- whipped cream
When the cake base has cooled off for 3 hours, you can cut it into 3 even layers. Put 1 layer of cakebase in your cake ring. Then melt 200 g of dark chocolate and pour it on the bottom layer. Let it cool off. Then add the first layer of custard on top of the chocolate and even it out. Add the 2nd layer of cakebase. On top add the 2nd layer of custard. Also even it out before adding the 3rd layer of cake base. Here I added a thin layer of whipped cream to make the fondant stick.
Warm up 200 grams of black fondant by working with it in your hands. Add crushed sugar on your table to prevent it from sticking to it. Then roll the fondant out into a thin round layer – aproximately 2-3 mm thick. Once it is big enough to cover your cake, add it on top. Use a cake spatula, to even out the fondant on the cake. Cut excess fondant away. Then use hot air to remove the crushed sugar from the fondant. Or use a warm wet cloth to get it off. Last but not least, decorate with your homemade fondant tools 😉
I wish you a happy baking day 😉
Hugs & Kisses
X
Dorothea

